

How to prepare and submit an article
General: Preparing and submitting an article to the Gizo Diocese web site is relatively easy and straightforward. However there are some "Tips and Tricks" which need to be learned and practice is beneficial. Also, this article was written for Pittwater Parish" rather thgan Gizo Diocese. So, I will eventiually replace these references but in the meantime, just be aware that the two websites are a little different, but work the same underneath what you see on the web pages.Now that you have a user name and a password, it is time to login. Please note that the "login" button only appears on some screens. Typically it will be there when reading this article, when exploring under the "Newsletters" item on the main menu or when looking at calendars or "Latest News" under the "News" menu item.
This graphic shows the location of the login button (blue on a white background). It should be towards the top right of your screen, even if you scroll downloads. Here is what it looks like.

Now, click on the login button and you should see the login form which looks as follows:
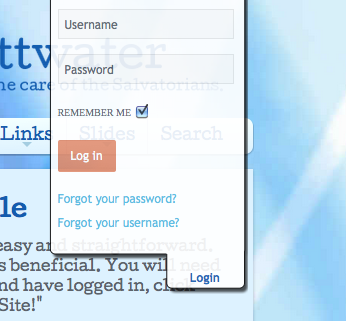
Fill in your username and password then click the "Log in" button with the orange background. (You can logout by clicking the white "Login" button which will now show "Logout" rather than "Login". Now it is almost time to create your article.
Word Processing: There are some similarities to word processing and we have tried to make it as easy as possible. However, articles on the web are NOT the same and do NOT use the same formats as word processing or graphics packages. On top of that, screens are different sizes from paper sheets and different users can use different size screens to view the same article so the shape can change.
By far the BEST way to prepare an article is to type it straight into the web "editor" and format it on the spot. Whereas you can copy and paste from other products, this can sometimes lead to difficulties. Why? Well, every program uses special invisible codes which are embedded in the document; these are not visible normally but (for instance) might "tell" the computer to start making text bold and red and then further in the document there might be codes to stop the bolding and red. Every program uses different codes so there is no compatibility. Some of the invisible codes can really "muck up" your document on the web. On top of that, programs such as Microsoft Word have so much "junk" in them that a web article prepared this way can be up to three times the size of one directly typed or copied/pasted from plain text.
If you need to prepare the same document for multiple purposes, there are some suggested ways to do it at the end of the article. Firstly, I am going to show a few basic things to get you started. Feel free to prepare "test" or "junk" articles because at the moment, when you submit an article, it will be checked (by me) before being published on the web. So, as long as you put something in the title or near the top of the article to say "Don't publish", then you can experiment without causing any problems. As people become more experienced, they will be able to write, edit AND publish articles.
Getting started: So, let's get started. There are a number of illustrations. You can click on them to make them bigger.
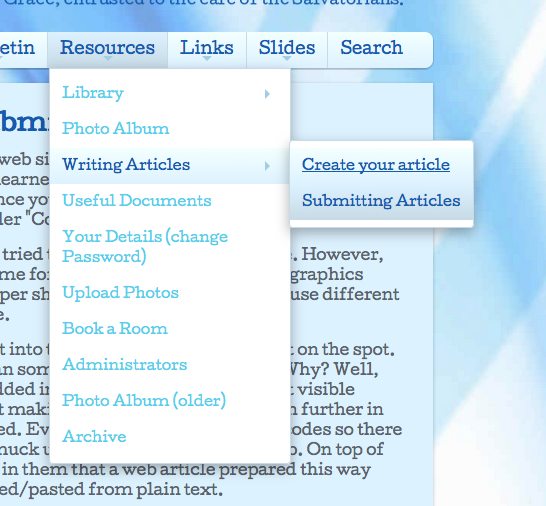 Go to the "Resources" menu item on the menu and then click on the item called "Create your article".
Please note that this menu item is only visible when you are logged in.
How things look. Once you have logged in, things on your computer screen will look similar to before, but not quite the same. If you look closely, other articles displayed on the website will have an extra icon in the bottom left hand corner. This is an "Edit" icon which is used to edit documents on the web site. Please refrain from editting articles which do not belong to you!
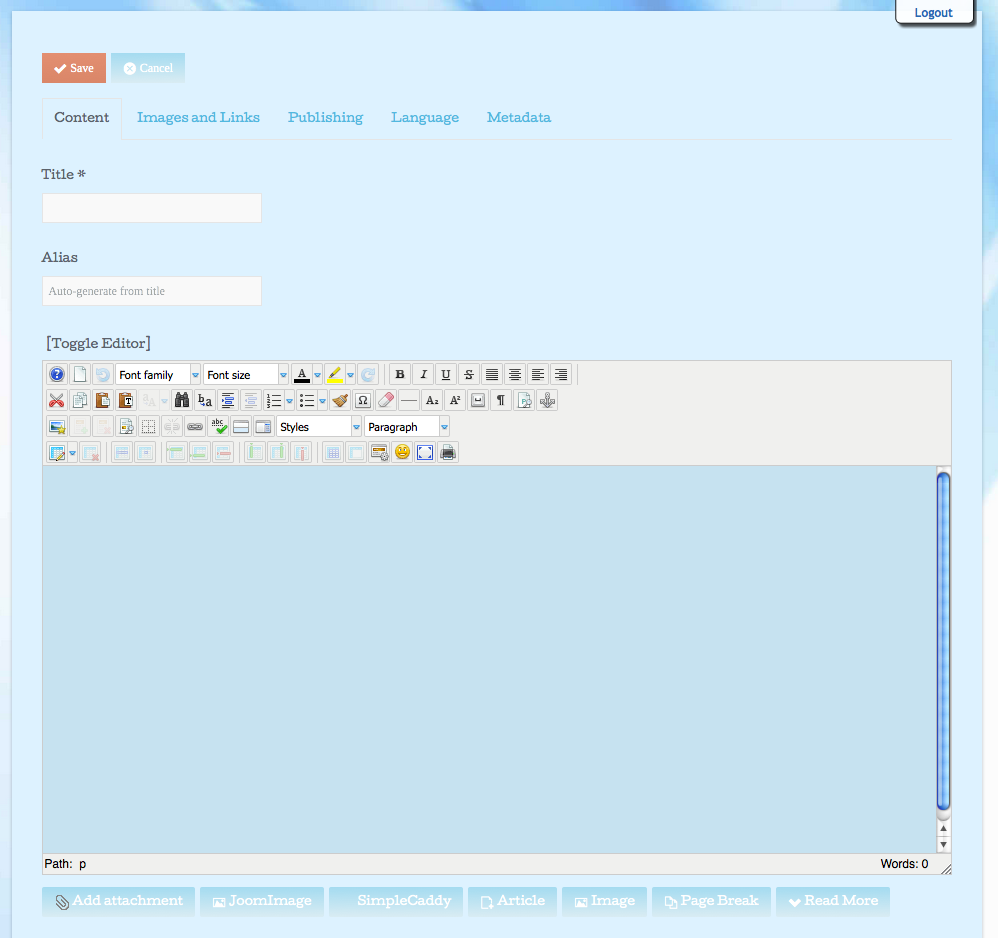
Your first article. You might choose to print this article (see the print icon at the bottom left) or you could use multiple "Tabs" on your browser so that your document is in one "Tab" and this article is in another "Tab" and you can switch between them.Once you have clicked the link to submit an article, you should see a window that looks as follows. Note that there is an area for typing text (ie the body of the article). There are also rows of "icons". These enable us to do a lot of things like inserting tables and photos, setting text sizes and colours etc. There are bulleted lists and some graphics options plus much more. Really, it is like a basic word processing editor which takes away a lot of the cumbersome web formatting tasks that experts need to use. You can move the mouse over each icon and some text should pop up to show what that icon does.
 The first step is to type in your article title. The "alias" field will be used internally within the website o reference the article but you can leave it blank. In rare circumstances, the generated alias will be a duplicate of another article and you might then have to type in your own alias (lower case letters and minus signs only).
Basically, you can now just type text into the window. Let the lines wrap automatically otherwise there will be problems on different sized screens. It is okay to use the enter key to space text (i.e. make paragraphs) but do NOT artificially shorten lines of text with the enter key or there WILL be problems displaying on some screens.
Note that you can highlight text and then click bold, underline, italics or the text colour. Try typing something now.
What you have typed might look like the following image:
Here are some basic rules which we would like you to follow. These are simply so that there is consistency between articles and they "fit in" when displayed alongside the menus and text of the web page.
Always have a heading such as:
"How to prepare and submit an article"
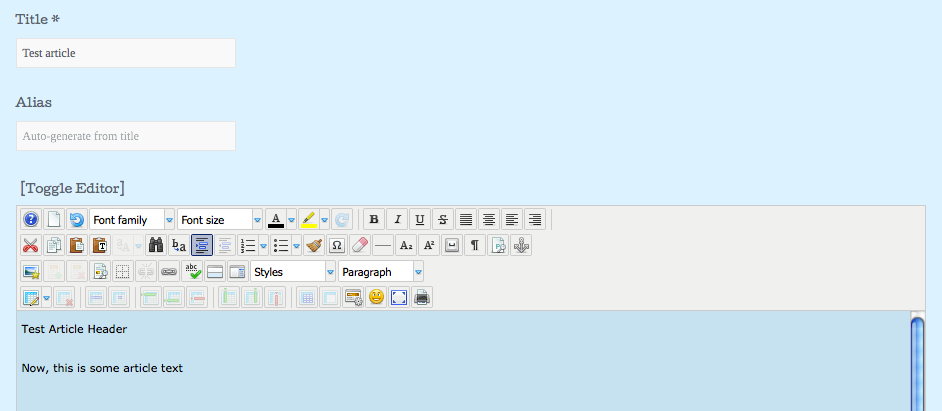
which is at the top of the article. I have typed "Test article header" in our example.
Often this will be the same as or an expansion of the article title. It is simplest to just type it and when you have finished, come back and set size, font, centering, colour etc. Note that you will do this by selecting a preset "Style" which will do the hard work for you.
- The normal article text should be the default as you type it. Please do not make it bigger/smaller without good reason
- Do not use all capitals for headings. On the web, this is considered to be similar to "SHOUTING" in a conversation!
- Colour is set using the "Select text colour" icon (looks like a capital A). Click it and select "more colours" then there is a spot to type in a number which will be a # symbol followed by six digits/letters (known as a web colour). The main colour blue used on the web site is #135cae .
Styles: Now, here are some other things to set. Let's assume your article had a heading and some text and that there is no formatting as yet. You have just finished typing it. Maybe your article looks a little like the one above.
We are now going to format the header. We do this using a pre-prepared style. This sets the font, the font size, the font colour, centering and a few other things. It takes the headaches out of remembering a whole lot of little steps.
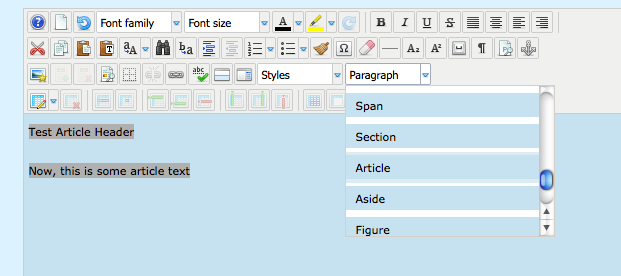
Highlight all the text you typed by using the cursor and then go to the Paragraph menu and select "Article". This tells the system that everything is part of an article.
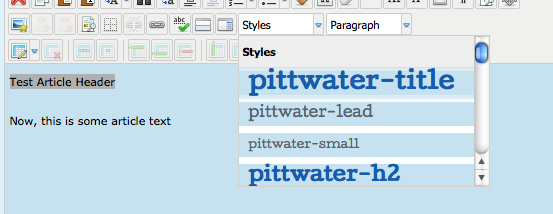
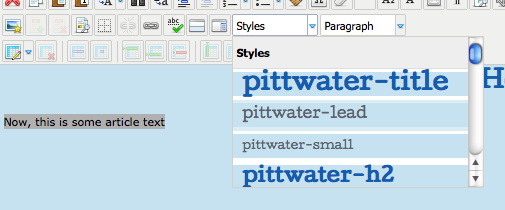
Now, select just the header text and go to the Styles menu and select the style called "gizo-title" which will be bold and blue. Click it.
Your header will become much bigger, blue (#135cae), centred, font set, size 24. All in one operation!
Next, highlight the article text and select the style called "gizo-lead". That will format all your text consistently.
Now, your article will look as follows:

The nice thing is that you have formatted the text and header in two simple steps which ensure consistency throughout the website!
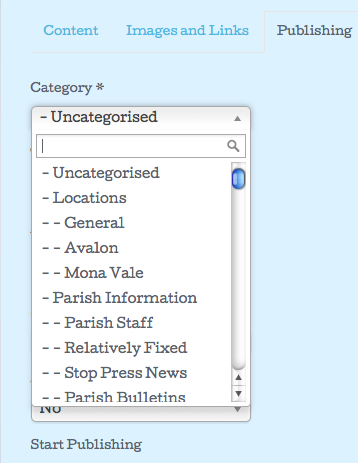
Final steps: Now, we are going to setup the final things. Please click on the "Publishing" link towards the top centre of the edit window.
All articles should be in a "Category". New categories might be required and you can contact me to create them. If in doubt, do not allocate them (by leaving the default) and we will sort it out when the article is published. Please select the Category/subcategory for the article.
Note that you can add an "Alias" if you are submitting the article on behalf of someone else.
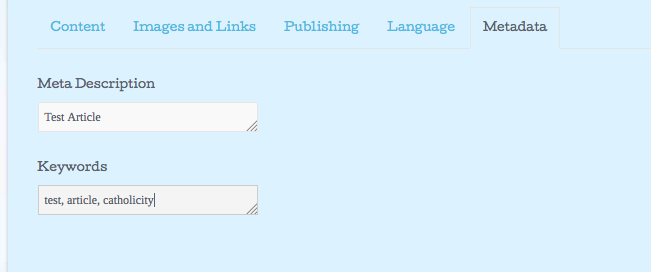
Another important area to fill in is a brief description of the article and what are called "keywords". Keywords allow people to search (e.g. using Google or Yahoo or some other search engine) for articles. Your list of keywords should contain from one to a maximum of 12 keywords. They should be single words separated by commas. Choose words that are descriptive of your article's content. You set these by clicking the "Metadata" link towards the top right.
Location: Where will your article be published? Some articles spend a short while on the front page. Others "live" under a Ministery or another menu item on the web site. To a large extent, articles will be placed depending upon the Category and will appear on the Front Page if the Featured check box is ticked. Note that you can also define a lifetime for an article so that publishing starts and stops on different times/dates.
Saving the document: Please do not go away and leave your document half finished- finish it and press the "Save" button near the top! There is nothing worse than a power failure or some other mishap and then having to re-do all that work a second time! When your document is saved, you will see a message like the following. After checking the document will be published. If you want to re-edit your article, you can go to the main menu, "What's on", then "Latest Articles". Click your article and then the small "Edit" icon towards the bottom left. If it is a while since you prepared your article, you could use the Search function from the top menu to find it. You did enter some keywords didn't you?
Copy/Paste. You can use Copy/Paste but on some web browsers you need to use the following keys rather than a menu item or a mouse button:
- Ctrl-C This copies a section of highlighted text (or photo in the web editor).
- Ctrl-X This cuts a section of highlighted text/photo. Remember to paste it somewhere else ASAP if you do not want to lose it!
- Ctrl-V This pastes something that was copied or cut.
Getting text from another program. As mentioned, this is not the best way to do things because you end up with LOTS of useless invisible "garbage" in the document which can cause it to do strange things. Documents from Word Processing packages like Microsoft Word are particularly bad and can cause the article to be three times bigger than it need be.
If you already have a typed document, you CAN copy/paste it straight into the web editor. If it is a Microsoft Word (.doc file format) you can highlight what you want, do "Copy" from the edit menu and then when in the web editor, you can paste it. Click the icon two to the right of the scissors icon (it is labelled "Paste" when you hover the mouse over it). Then use ctrl-V to paste into the window which pops up then insert will place it at your mouse location in your article.
You can use the same technique from plain text (eg from an email). However, you click the icon with a "T" on it ("Paste as Plain Text") or just paste it into the body of the article.
You can also use the powerful and free "OpenOffice" package (which is also highly Microsoft compatible). Just open your document and then do "Save as" and use "html format". Once saved in that format, you can just copy and paste directly into the web editor with quite good results. With the latest versions of Microsoft Word, you can probably also do the same. You can alsopaste text from "formatted" or "HTML formatted" emails directly into the editor window. Then highlight it and click the Eraser icon just to the right of the "Styles" drop down menu on the top row of icons.
Text needed in multiple programs: Let's say you want to type the text of an article which will be used on the web and in the Parish Bulletin. The BEST way is to type the document straight into the web editor. Then when finished, before inserting photos etc, highlight all of it and press "Ctrl C" on your keyboard to copy it. Then you can use "Control V" to paste it into a different program such as Microsoft Word or Adobe Freehand (et al).
Alternatively, type the document in simple text with no formatting other than capital letters, full stops and maybe line breaks. For instance, a simple email "compose" window would be okay or you could use Microsoft "Notepad" or "Wordpad" providing you save the information as a text (.txt) file. Then when finished, highlight it all, select "copy" or type "Control C" to copy the text. You can then use "Control V" to paste it into another program and/or into the web editor. On an Apple, the "Command" key is usually used instead of "Control".
Getting back to your document. Let's assume you saved your article but wish to make some changes. Because the article is not yet published, you will have to wait until it is published. Then use the search facility on the web site to find it. Just click search (top right) and enter some keywords (you did enter some didn't you?) Alternatively, you could enter the Category. Once you find it you can click the edit button at the bottom left to get back into the editor.
Inserting a photo: Inserting photos or other images can be straightforward for simple cases but can get more complicated if you want to do something "special". Let's take a simple case. Put the cursor where you want the photo and left click. Then click the icon labelled "Insert/Edit Image" underneath the scissors icon (see the following graphic).
 This is my preferred way to upload and edit photos. There is also a simple link called "Image" towards the bottom centre of the edit screen. It allows you to upload or select an existing photo. But the problem is you then need to use the "Inseert/Edit Image" button to finish off the details.
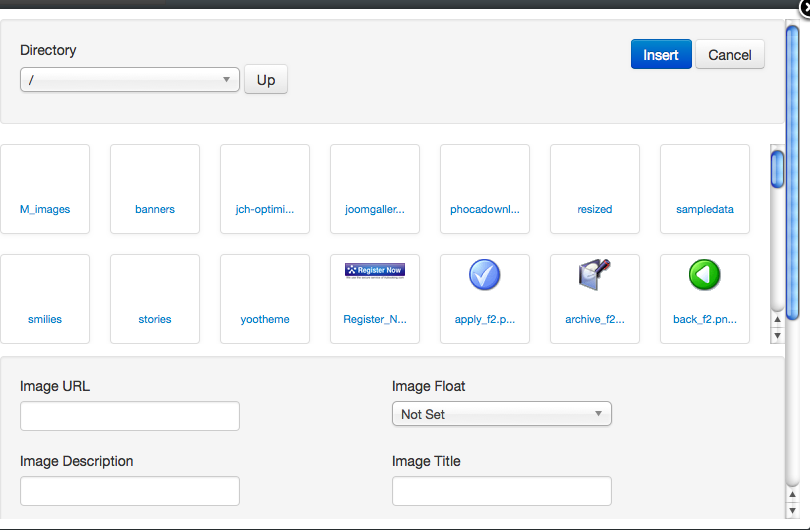
Firstly, you need to select a folder within the web database where your photo will be stored. If you only have a few photos, you can put them in a folder called "General Photos" or there might be another folder that seems more appropriate. If you have many photos, you should contact me and I will setup your own special folder so that we keep things neat and tidy. From this screen, you can also upload your own photo/s and also perform "drag and drop" from your PC.
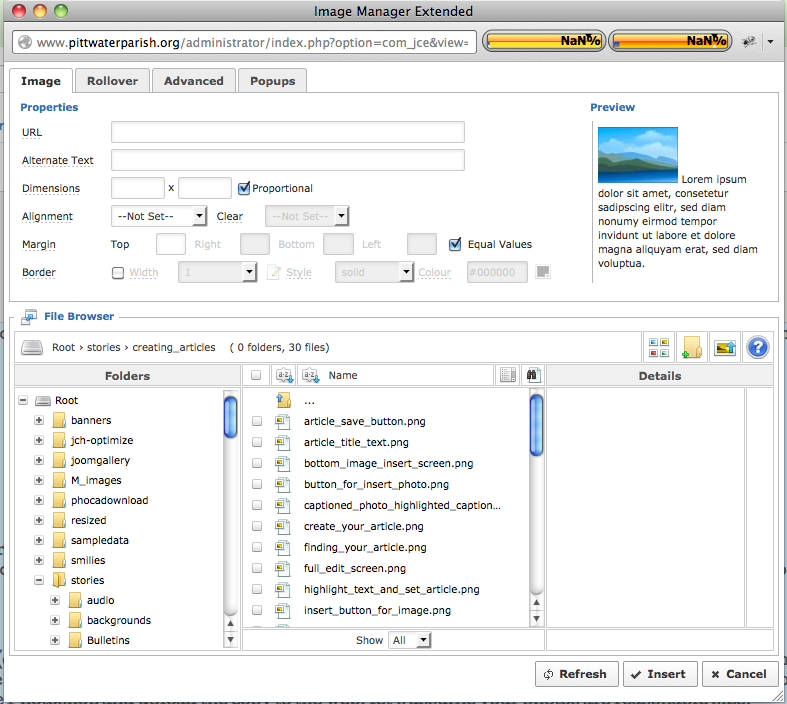
Note that your photos should be no larger than about 150Kbytes (e.g. 0.15MB or 150KB or 150,000B). In other words, about 640 pixels (i.e. dots) across. Storage space costs money and also if photos are bigger than this, the download time on peoples' computers will be excessive and they will probably not bother trying to read or access your article. If your photos are too big, you need to make a smaller copy using a program such as Adobe Photoshop and upload the copy to the web. let's assume your photos are a reasonable size.
Let us assume your photo is already in the database. Select the one you want. Then there are a few other options to select. It is best to select a margin all around of 8. Also, you can set left/centred/right justification. You can also determine whether or not text will wrap around the image using te button labelled "Clear". You can see the effect of this in the small preview window (top right). Nothing set allows full text wrap. Clear both means no text wrapping. When you are finished, click insert (or update if you are editting a photo previously inserted).
If your photo is too big, click it to select and use the corner drag handles to resize. Best not to use the ones along the sides of the photo or you will distort it.
If you want to upload a photo, you can use the buttons to the left of the question mark, half way down, right hand side. You can do drag/drop here and rescale the photo.
Now, here are a couple of screenshots of using the bottom image button to enter a photo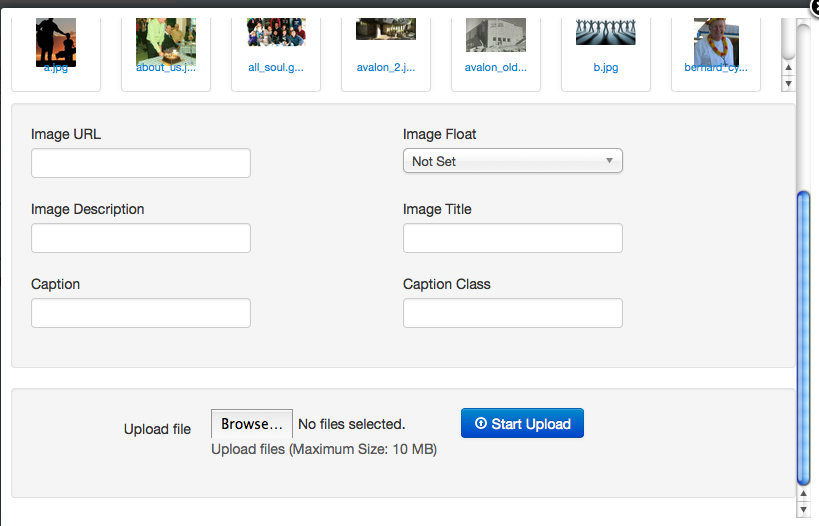
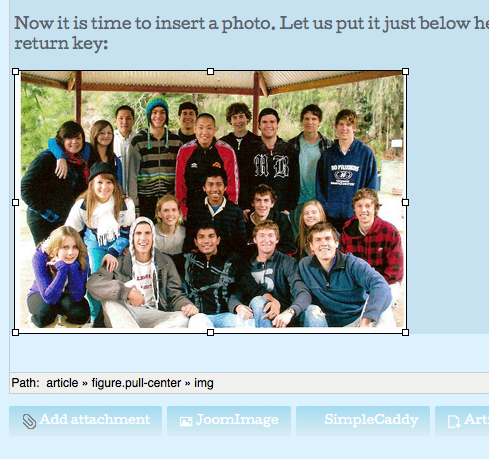 Okay, let us look at the article with the image inserted. At this point, we have just returned from the process of entering the image and have resized it with the corners. Now it is time to add a caption. This USED to be a "pain" but now we have our very own caption facility. Firstly, make sure that the image is highlighted. Click on it again if necessary. Then, the small caption icon immediately to the right of the Image Insert/Edit button will be fully coloured. Click on it and the caption editor will pop up.
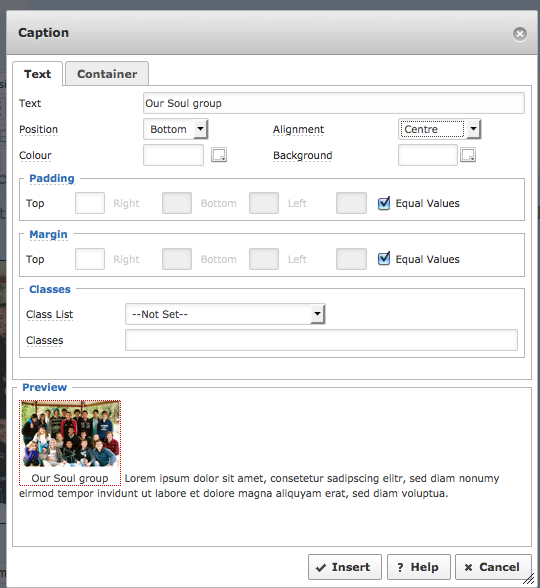 Insert the caption text, set it to centred and then click "Insert". You should now see the photo with the highlighted caption underneath. We just need to make this bold (if required) by clicking the "B" for (Bold) button in the top row of icons on the editor and perhaps set the colour if required by clicking the big A with a black bar at the bottom.
Do not forget to save your article!
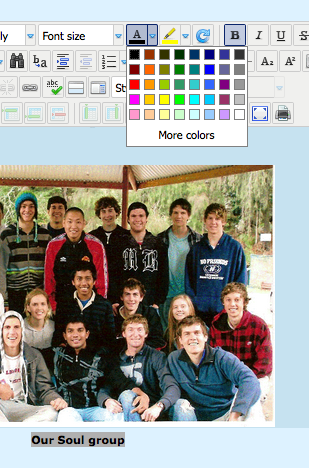
Here is what our test article looks like as we select the caption colour.
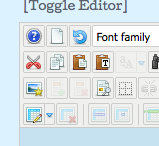
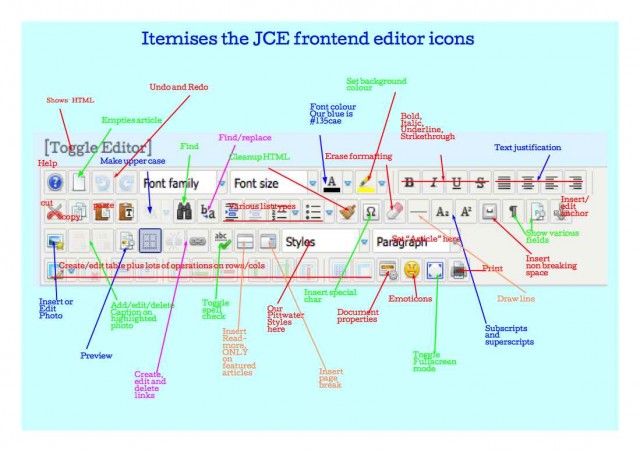
Here is an image of the editor icons as you see them in the Frontend of the web site (i.e. here). There are a few extra features when you use the same editor in the Administrative interface. You can also download a PDF of this image at the end of this article in case you would like to print it out. You need to click the "All Pages" link and scroll to the bottom of the article.
Well, if you get this far, you have done very well.